Installing Drupal
Video link: To install Drupal manually
Chapter 3 of the Drupal User Guide covers server requirements, additional tools, preparing for installation, and running the installation script. Chapter 4 covers the next steps that should be done after the installation script has been completed.
This guide covers a significant portion of the same material. These pages cover more options than the User Guide, with somewhat less detailed instructions. When information is available in other developer guides, we link to them rather than repeat it here.
Before a Drupal installation
A PHP enabled web server and a database server is required.
Installing Drupal requires that you have a web server and a database server. All requirements are listed in the System requirements documentation guide. A summary of the requirements are also provided.
The requirements can be resolved locally, on your PC, or using a hosting provider:
- The recommended local development environment for macOS, Linux, and Windows is a Docker-based solution such as DDEV or Lando. Read more in the Local server setup documentation guide.
- Most commercial shared web hosting companies fulfil the requirements too.
- There is also Drupal specific hosting.
Get the Code
Install the files you need to run Drupal
Composer is used to manage Drupal and all dependencies (modules, themes, libraries). Make sure you have composer installed on the host where you're going to install Drupal before executing any Composer commands. To install the current official release of Drupal, run
composer create-project drupal/recommended-project my_site_name_dirThis will create a Drupal project in my_site_name_dir and automatically execute composer install to download Drupal and all its dependencies. For more information read Download Drupal core using Composer in the Using Composer developer guide. Using Composer requires that you are able to use a command line on the machine where you plan to install Drupal.
If Composer is not an option for you, there are detailed instructions, with screenshots, for the manual installation in Section 3.3 of the Drupal User Guide. Check the project page for Drupal for the current/latest release.
Developers and contributors
To contribute to development, you should download Drupal using git. There is an entire section of documentation for using git with Drupal, but you can find the basic instructions by visiting the project page for Drupal and opening the Version control tab.
Note: if you install Drupal with git, then make sure to read the page "Install dependencies with composer" in this guide.
Install dependencies with Composer
After updating the codebase with Git, the required PHP libraries must be installed with Composer
This step is needed only if you have installed (or updated) the codebase using git.
If you do not have composer installed, see the official composer installation instructions.
In order to get a working codebase, you need to run composer install --no-dev from the top level of the repository. This will install Symfony and other packages required by Drupal in the vendor/ directory.
If you skip this step, then you are likely to see an error message like this when you try to run the installer:
Warning:require(.../drupal/vendor/autoload.php):failed to open stream:No such fileordirectory in.../drupal/autoload.php on line14
It is important to include the --no-dev option when installing packages for your production server. Some packages, such as phpunit/*, are inherently insecure and should never be installed on the production server. If you are installing Drupal on a local or development server, and you want to install development packages, then leave off the --no-dev option.
You may also add the -o option, to generate optimized autoload files. For a complete list of options for the composer install subcommand, use composer help install.
Create a database
Create a database for Drupal to use
This documentation needs review. See "Help improve this page" in the sidebar.
If you are installing Drupal on a test site, then you can skip this step. When you run the installation script (next step) just supply the user name and password of a database user with permission to create a new database.
If you are installing Drupal on a public web server, then you should create the database first, and give access to a less privileged user. The database user you specify during installation is the one that will connect to the database on every page load.
This page provides direction for creating your Drupal database using one of the following methods:
- Web browser-based control panel (such as "CPanel" or "Plesk")
- phpMyAdmin
- Using SQL commands (using the command line)
Selection of characters in MySQL/MariaDB database name
- If you use capital letters in the database name, they will be converted to lower case.
- Allowed characters are a..z, 0..9, and "_" (underscore).
Create a database and user via a browser-based control panel
Most web hosting accounts provide a Web-based control panel to help you administer your site. These tools include easy-to-use features for creating a new database, and for creating a "user" with rights to the database. To create a database using a browser-based control panel consult the documentation or ask your web host service provider.
When you create the user for your database, you may see a page where you can specify the privileges that the user will have for various operations on the database. In most web control panels' "database wizard", if you simply check "All" privileges for the user you create (and then uncheck "Grant" if it is listed as a privilege) your user will be set up correctly.
Take note of the username, password, database name and hostname. (For example, are you installing in http://example.com, or in http://drupal.example.com, or http://example.com/blog etc.?) as you create the database. You will enter these items into fields in your browser when running the installation script
Note that in many cases when creating databases and users via a web-based interface, the username you use to log into your control panel is added as a prefix to the database name and possibly to the database username as well. For example, if you log into your site's control panel as "webadmin" and create a database named "drupaldb" and a user for that database named "dbuser", when running the installation script (next step) the database and user may need to be typed in as "webadmin_drupaldb" and "webadmin_dbuser". This is because many hosting accounts are on shared servers, and on one server each database and user name must be unique across all accounts on the server.
Create a database and user using phpMyAdmin
The most secure method to use when creating a database with phpMyAdmin is to create a user that has all privileges to the new database, but no privileges to the other databases. This is more secure than using a general username and password for all of your sites on the same server, as it limits access to your databases if someone gets hold of your database logins.
Note: This procedure assumes that you have root access to phpMyAdmin, and that you're using phpMyAdmin 3.5.x.
- Sign in to
phpMyAdminas the root user. - Click Users, and then click Add user.
Note: You can use the root user credential as well. - In the User name field, enter the username that you want to use.
- In the Host field, select Local, which is a more secure setting, unless you'll be accessing the database with this user from another server.
- Enter or generate a password for the user.
- In the Database for User section, select Create database with same name and grant all privileges.
- Make sure you select
utf8mb4_unicode_ciorutf8mb4_general_cifor COLLATION.- Note: The difference between the two collations is how much faster they are in character comparison and sorting. utf8mb4_general_ci is slightly faster however utf8mb4_unicode_ci is more accurate for a wider range of characters. If you are unsure use utf8mb4_unicode_ci.
- Note: If you do not have the option to select COLLATION during this routine, you can change it later. Select your database from the Databases menu, then click Operations. There you will find a section for Collation where you can select the desired setting.
- Click Go to create the user.
phpMyAdmin creates the new database with the same name as the user account. If you want to have a different name for the database and the user:
- Click Databases, and then click the link for the database that you want to rename.
- Click Operations.
- In the Rename database to section, enter the new database name.
- Click Go in the Rename database to section.
If you need more details about using phpMyAdmin, check out the official wiki.
Take note of the username, password, database name and hostname. (For example, are you installing in http://example.com, or in http://drupal.example.com, or http://example.com/blog?) as you create the database. You will enter these items into fields in your browser when running the installation script.
In many cases, when creating databases and users using a web interface, the username that you use to sign in to your control panel is added as a prefix to the database name, and possibly to the database username as well. For example, if you sign in to your site's control panel as "webadmin" and create a database named "drupaldb" and a user for that database named "dbuser", when running the installation script the database and user may need to be typed in as "webadmin_drupaldb" and "webadmin_dbuser". This is because many hosting accounts are on shared servers, and on one server each database and username must be unique across all accounts on the server.
Create a database from the command line
If you do not use a Web control panel or are experienced with and prefer to use MySQL, MariaDB or PostgreSQL commands, you can use the information in the following sections.
Additional information about privileges, and instructions to create a database using the command line are available in the INSTALL.mysql.txt file for MySQL/MariaDB and in the INSTALL.pgsql.txt file for PostgreSQL.
Create a database using MySQL/MariaDB commands
Note: The database should be created with UTF-8 (Unicode) encoding (utf8mb4) and either the utf8mb4_unicode_ci or the utf8mb4_general_ci collation. The difference between the two collations relates to how fast they are in character comparison and sorting. utf8mb4_general_ci is slightly faster however utf8mb4_unicode_ci is more accurate for a wider range of characters. If you are unsure use utf8mb4_unicode_ci.
For information on installing and configuring MySQL see http://dev.mysql.com/doc/refman/5.7/en/index.html.
For information on installing and configuring MariaDB, see https://mariadb.com/kb/en/.
In the following examples, 'username' is an example MySQL/MariaDB user who will have the CREATE and GRANT privileges and 'databasename' is the name of the new database. Use the appropriate names for your system.
Create a new database for your site. (Change the
usernameanddatabasename.)mysql -u username -p -e "CREATE DATABASE databasename CHARACTER SET utf8mb4 COLLATE utf8mb4_unicode_ci";MySQL/MariaDB prompts for the 'username' database password, and creates the initial database files.
Log in and set the access database rights:
mysql -u username -pMySQL/MariaDB prompts for the 'username' database password.
At the MySQL/MariaDB prompt, create the user and set the permissions using the following command (this will create the user and grant privileges):
CREATE USER username@localhost IDENTIFIED BY 'password';

GRANT SELECT, INSERT, UPDATE, DELETE, CREATE, DROP, INDEX, ALTER, CREATE TEMPORARY TABLES ON databasename.* TO 'username'@'localhost' IDENTIFIED BY 'password';
For newer MySQL versions, the
IDENTIFIEDBY'password';part of the query is not necessary.Be sure to use backticks (
`) around the database name if you used a MySQL or MariaDB escape character (_or%) in your database name. Additionally, since the underscore character is a wildcard, when you want to use an underscore character as part of a database name, you should specify it as\_in the GRANT statement. For example,drupal_test_account.*should be`drupal\_test\_account`.*for security; otherwise the underscores would match any character and could accidentally give access to other similarly named databases.Unless the database user/host combination for your Drupal installation has all of the privileges listed above (except possibly CREATE TEMPORARY TABLES, which is currently only used by Drupal core automated tests and some contributed modules), you will not be able to install or run Drupal.
To be able to restore a database dump created by Drush, you need to add LOCK TABLES privilege to allow execution of
LOCKTABLESandUNLOCKTABLES.For further information on the GRANT statement, see GRANT Statement.
- 'databasename' is the name of your database
- 'username' is the username of your MySQL or MariaDB user account
- 'localhost' is the host where Drupal is installed
- 'password' is the password required for that username
If successful, MySQL/MariaDB will reply with:
Query OK, 0 rows affected
Flush the privileges to make sure the user has the active privileges by typing
FLUSHPRIVILEGES;in the MySQL terminal.The recommended transaction isolation level for Drupal sites is 'READ COMMITTED', see Setting the MySQL transaction isolation level.
- Close the MYSQL/MariaDB terminal by typing
exit. The server will answer withBye.
Create a database using PostgreSQL
The database must be created with UTF-8 (Unicode) encoding.
Create a database user
This step is only necessary if you don't already have a user setup (e.g. by your host) or you want to create a new user for use with Drupal only. The following command creates a new user named 'username' (you should substitute this with the desired username), and prompts for a password for that user:createuser --pwprompt --encrypted --no-adduser --no-createdb usernameIf everything works correctly, you'll see a
CREATEUSERnotice.Create the database
This step is only necessary if you don't already have a database set up (e.g. by your host) or you want to create a new database to use it only with Drupal. The following command creates a new database named "databasename" (you should substitute this with the desired database name), which is owned by previously created "username".
createdb --encoding=UNICODE --owner=username databasenameIf everything works correctly, you'll see a
CREATEDATABASEnotice.If you are installing Drupal 10+, you may also need to install the pg_trgm extension into the database:
psql -c "CREATE EXTENSION pg_trgm" databasename adminusername
Run the installer
Run the installation script
Goal
Install the core software and create the admin account by running the included installer.
Site prerequisites
Steps
- If you are using a 1-click install from a hosting provider or demo site, you will most likely see some or all of the following screens as part of the installation process. If you uploaded the core files manually or using Composer, to start the installer, open a browser and visit the URL that you set up for your hosting.
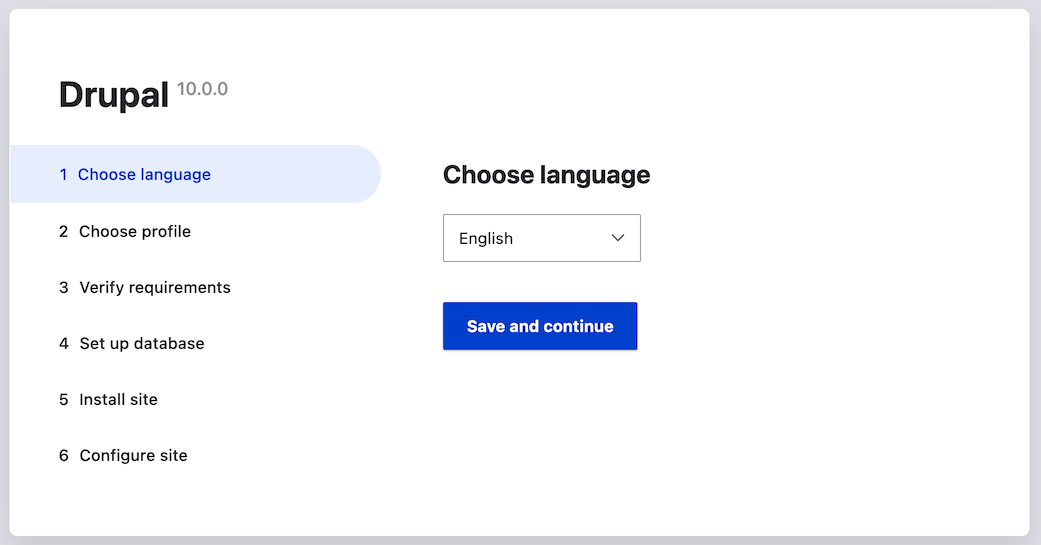
Select a language on the first page of the installer; for example, English. You could optionally choose from any of the other listed languages. The language files for the chosen language will be downloaded and installed so that the rest of the installation process can be finished in the chosen language. After choosing a language, click Save and continue.
Select an installation profile. Installation profiles provide site features and functions for a specific type of site as a single download containing the core software, contributed modules, themes, and pre-defined configuration. Core contains two installation profiles. Select the core Standard installation profile. Click Save and continue.

- The next step in the installer will verify that your system meets the minimum requirements. If it does not, you’ll be presented with an outline of what needs to be corrected in order to proceed. If it does, the installer will automatically advance to the next step.
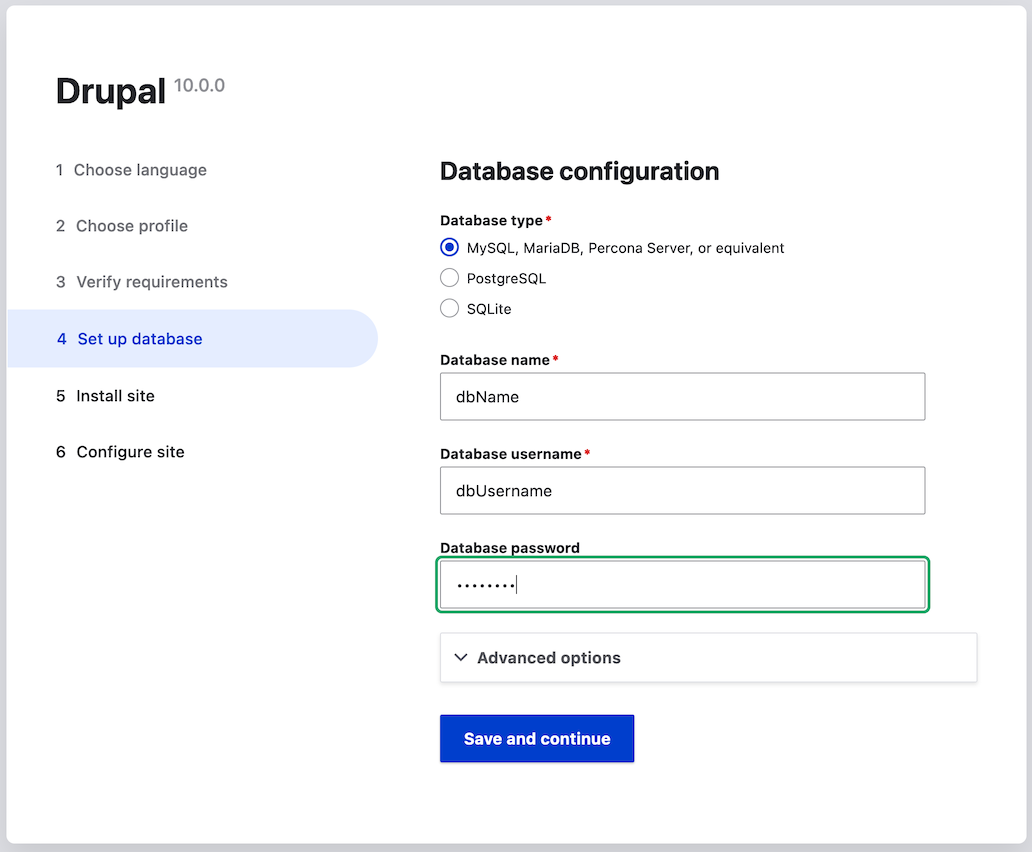
Provide details of the database you created in the Section 3.4, “Preparing to Install” chapter. Then click Save and continue.
Field name Explanation Value Database name
The custom name given to the database
drupal
Database username
Username created
databaseUsername
Database password
Password chosen
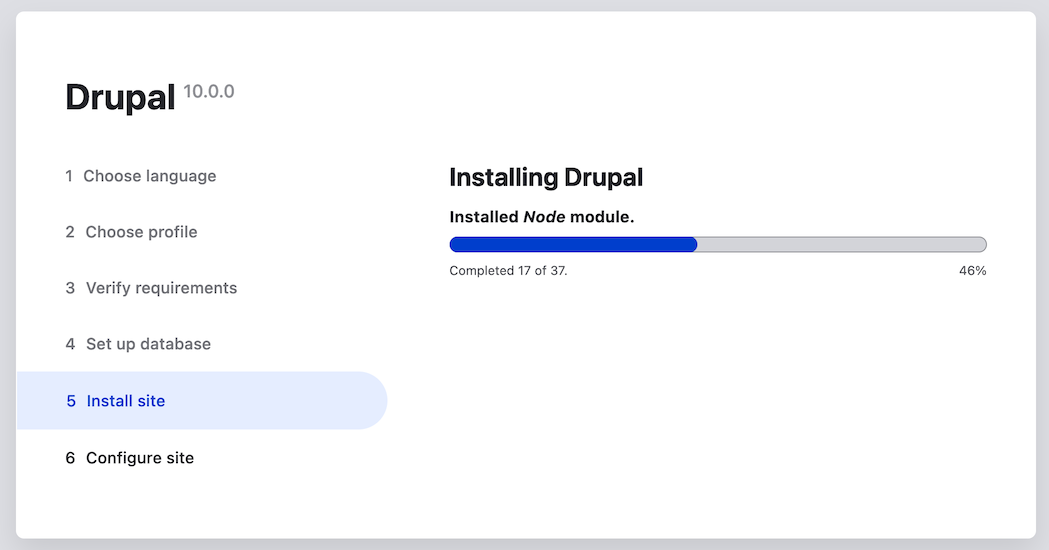
The next step will display a progress bar under the heading Installing Drupal. After the installer has completed, it will automatically advance to the next step.
The next step is to configure some basic information about your new site (also notice if there is a warning about file permissions, for a later step). Note that the user account you create in this step is the site’s admin account. See Section 7.2, “Concept: The User 1 Account” for important information about this unique account. You can safely name this account "admin", and make sure to choose a secure and unique password.
Fill in the form with the following information:
Field name Explanation Value Site name
The name chosen for the site
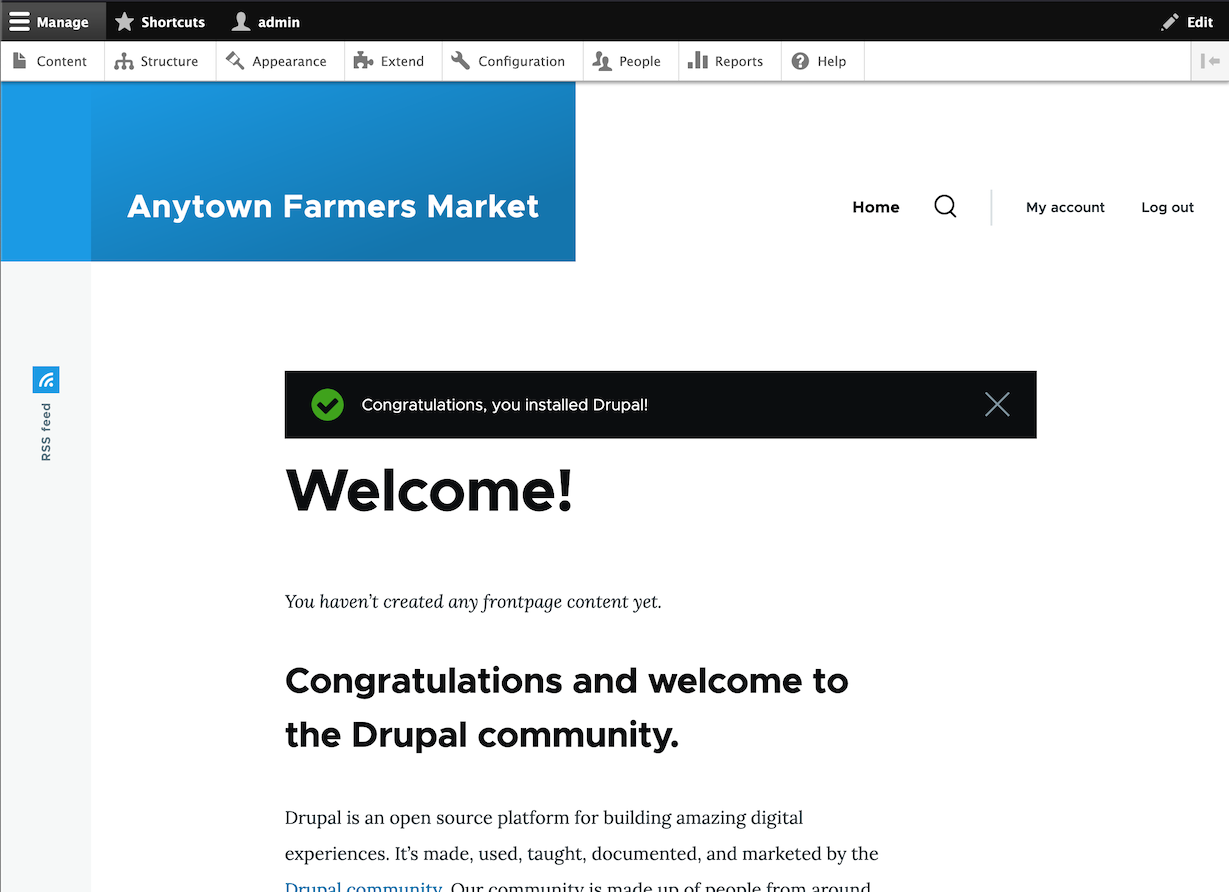
Anytown Farmers Market
Site email address
The email associated with the site
Username
The designated user’s credentials
admin
Password
The password chosen
Confirm password
Repeat the password
Email address
The user’s email
The remaining fields can likely be left at their default values.

- Click Save and continue.
You will be redirected to the front page of your new site and you should see the message Congratulations, you installed Drupal! displayed at the top of the page.
- You may have seen a warning in the Configuration step about file permissions, and you may continue to see this warning until you fix the permissions. To avoid the warning and make your site more secure, change the permissions on the sites/default directory and the sites/default/settings.php file so that they are read-only (you may need to consult your hosting company documentation about how to do that).
Expand your understanding
Check the Status Report to see if there are any problems with the installation. See Section 12.5, “Concept: Status Report”.
Status check
Check the status of your site
Add Composer to an existing site
How to convert an existing Drupal site to a composer-managed project. Step by step guide to adding composer to manually installed site.
Building a Drupal site with Git
How to use Git to manage the source code for a Drupal site
Drupal Quick Start Command
Launch a local demo version of Drupal.
Trusted Host settings
Protecting against HTTP HOST Header attacks
Install Drupal using DDEV
The Drupal community recommends using DDEV